
New User
Obtaining account
Please provide the following information to the system@nicadd.niu.edu
- your full name, title (student, collaborator, e.t.c) and e-mail
- a preferred account (login) name at nicadd
- your project supervisor contact info
- a short project description
- an estimation of the required resources (disk space, CPU hours, access to specific hardware or software, e.t.c.)
After approval, you will receive a welcome message with account information and cluster access instructions.
The first login
The NICADD cluster is accessible via SSH protocol. Linux and MAC systems do have or allow easy installation of command-line SSH clients. On Windows systems, one can install the free "PuTTY" ssh client.
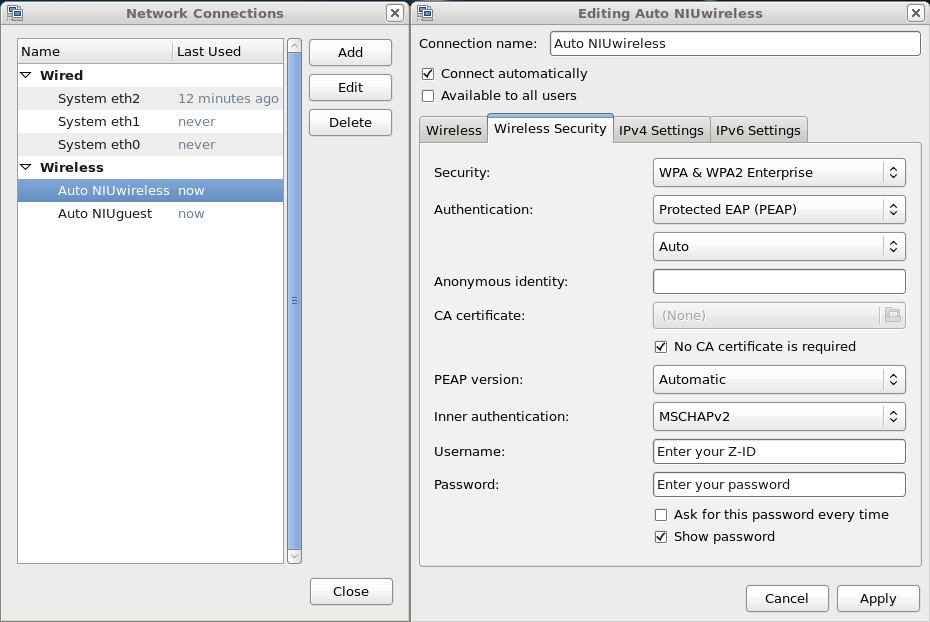
!!!NIU specific
Only protected NIUwireless network (ZID/password) or wired desktops can be used for connections. Cluster nodes are not accessible from the public wireless "NIUguest" network. Connection instructions:
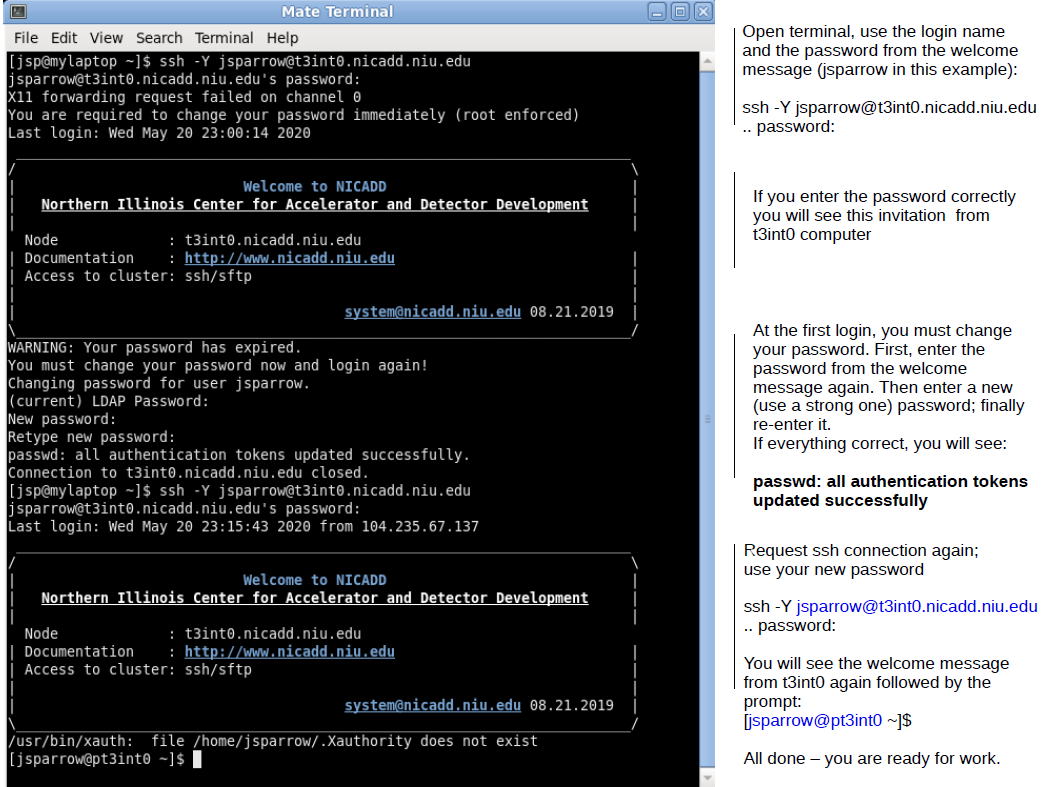
Cluster access from Linux or MAC
- open a terminal program (xterm, konsole, e.t. c.)
- type ssh -Y loginName@t3int0.nicadd.niu.edu
- Follow instructions from the welcome message
Below is an example of the first login session. When entering a password, keep in mind:
- passwords (and usernames) are case sensitive. You should enter the exact username and password from the welcome message. Only username 'jsparrow' (and not 'JSPARROW' or 'JSparrow' or any other variant) will work in the example below.
- there is no feedback on passwords typing in the terminal for security reasons. You will see no characters (even no asterisks) appear when you entering your password. Just type the password and hit Enter - only then the system will either accept either reject your input with some feedback message.
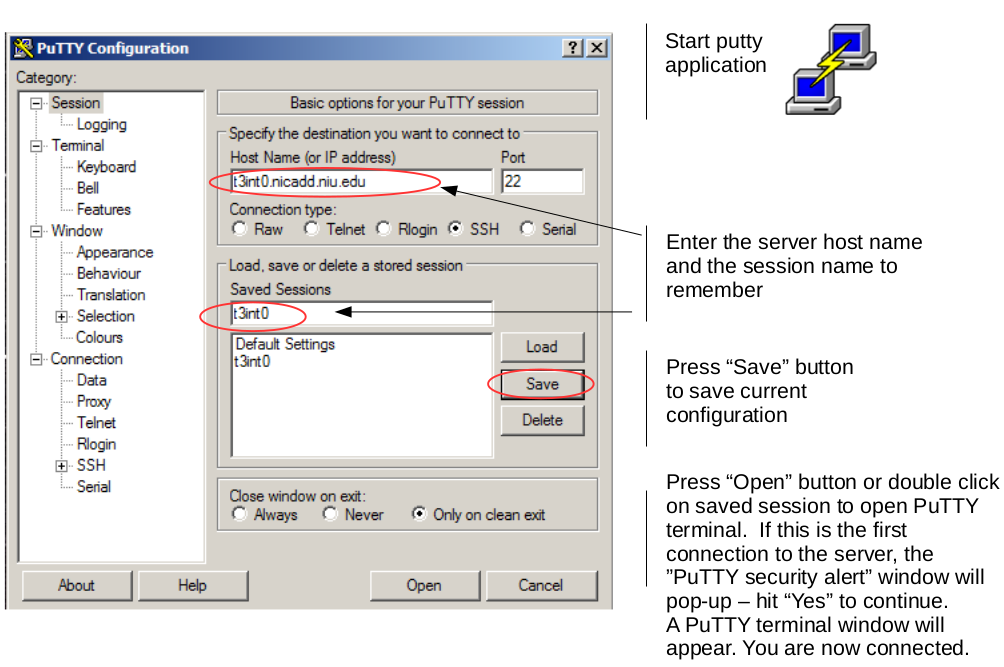
Cluster access from Windows
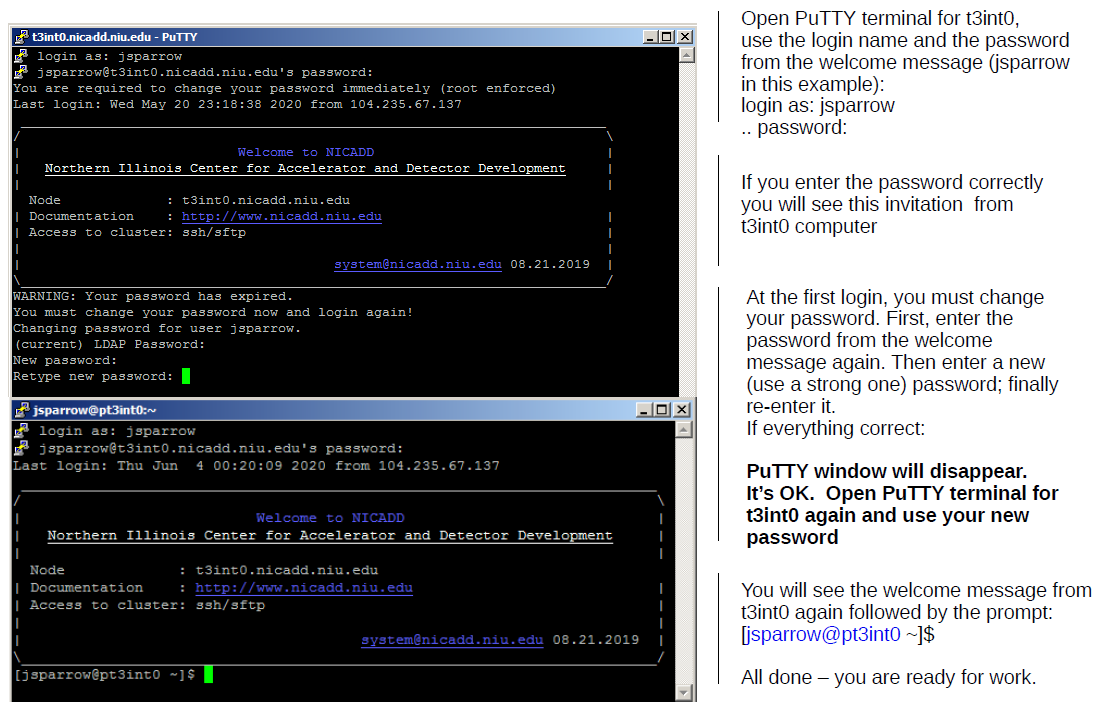
Below is an example of the first login session. When entering a password, keep in mind:
- passwords (and usernames) are case sensitive. You should enter the exact username and password from the welcome message. Only username 'jsparrow' (and not 'JSPARROW' or 'JSparrow' or any other variant) will work in the example below.
- there is no feedback on passwords typing in the terminal for security reasons. You will see no characters (even no asterisks) appear when you entering your password. Just type the password and hit Enter - only then the system will either accept either reject your input with some feedback message.
- install and run Putty ssh client
- configure/save/open a session to t3int0.nicadd.niu.edu
- Follow instructions from the welcome message. Here is an example of the first PuTTY login session.

Passwordless login via SSH public key
We allow and recommend to setup SSH public key authentication on all trusted computers to access nicadd systems. The SSH public key machinery provides more robust security and protects against forgotten passwords. A detailed tutorial can be found at https://kb.iu.edu/d/aews.
The first interactive session
If login steps were completed correctly the system will greet you with the following message:
 _________________________________________________________________________
/                                                                         \
|                           Welcome to NICADD                             |
|   Northern Illinois Center for Accelerator and Detector Development     |
|                                                                         |
  Node             : t3int0.nicadd.niu.edu
| Documentation    : http://www.nicadd.niu.edu                            |
| Access to cluster: ssh/sftp                                             |
|                                                                         |
|                                       system@nicadd.niu.edu 08.21.2019  |
\_________________________________________________________________________/
[userName@nodeName ~]$
Congratulations! You are ready to start some real work. Those who have not been working in a Linux environment before, may need to complete the next short tutorial.
A minimal Linux dictionary
- terminal - the window you are working in
- command line - the line in the terminal to enter a command, starts with the "prompt", "userName@nodeName ~]$"
- login shell - a program that interprets commands ("bash" by default)
- shell environment - a set of variables known to the shell program. You can list the predefined variables with
[userName@nodeName ~]$ env
- The variables are displayed in capital characters; their assigned values follow the "=" sign.
- data disks - devices to store data
- file - a collection of data, a digital document, stored on a storage device under a specific name
- directory or folder - a location for storing files on your data discs
- path - an address of a specific file or directory in the filesystem directory tree in form /dir1/subdir1/subdir1/myfile
- current working directory - the directory in which you currently working in. To display, do
- echo $PWD
- home directory - the default directory, the directory in which you placed immediately after login. To display, do
- echo $HOME or echo ~/
- shell start-up files : ~/.bashrc and ~/.bash_profile. Special files in your home directory the login shell program checks at the beginning of the session. In these files, you can define custom shell variables and "aliases" (shortcuts to sequences of commands).
- shell script - a file with a set of commands which can be interpreted by a shell program, or by a specific interpreter
- application program - a file containing compiled (encoded) sequence of instructions the computer can run. For details see How programs are executed?
- To learn more about the bash and environment google for "bash tutorial".
- To use available software modules read this tutorial
A minimal command set
- To get fast help about a specific command, do "man command" or "info command" or "command --help". For example, try
[userName@nodeName ~]$ man ls
[userName@nodeName ~]$ info ls
[userName@nodeName ~]$ ls --help
- To list the content of a current folder: ls; ls -l; ls -la; ls -ltrh - provide a different level of listing details - correspondingly:
- ls - the single column listing
- ls -l - the detailed (long) listing
- ls -la - the detailed listing showing hidden files and folders (names begin with "." )
- ls -ltrh - the detailed listing showing files reversely ordered by the creation time with their sizes in "human-friendly" format (kilobytes, megabytes, gigabytes, terabytes).
- To create a new directory myNewDir in the /somePath/ folder
- mkdir /somePath/myNewDir
- if /somePath/ is not given the myNewDir will be created in the current working directory
- To enter directory /somePath/myNewDir:
- cd /somePath/myNewDir
- if /somePath/ is not given the destination directory will be the user's home directory
Editing files
To create an empty file with the name, for example, newfile.txt do "touch newfile.txt". To edit files in a terminal window, we suggest use emacs or vim editors programs. Examples: "vim newfile.txt" or "emacs newfile.txt". Warning - both editors have a very specific shortcut setting, google for corresponding tutorials and documentation. For less complex edits "nano" editor can be used.
Running graphical applications (X-windows applications)
Graphical Linux applications are called X-applications (xterm, XEmacs, nedit, etc.) because they use the X Windows protocol to present their windows. Correspondingly they need software (called X-server) running on a user's desktop. Linux users connected from their graphical environment already have X-server on their system can run X-applications installed on the cluster immediately after login.
Access X-applications from Mac OS
Download a free XQuarz server for macOS. For detailed installation instructions visit this page. Install and launch XQuartz, then
- open macOS terminal program
- type ssh -Y loginName@t3int0.nicadd.niu.edu
Access X-applications from Windows
- 1) download, install and launch a free Xming X-server
- 2) additionally, configure the t3int0 PuTTY session as shown in the picture below
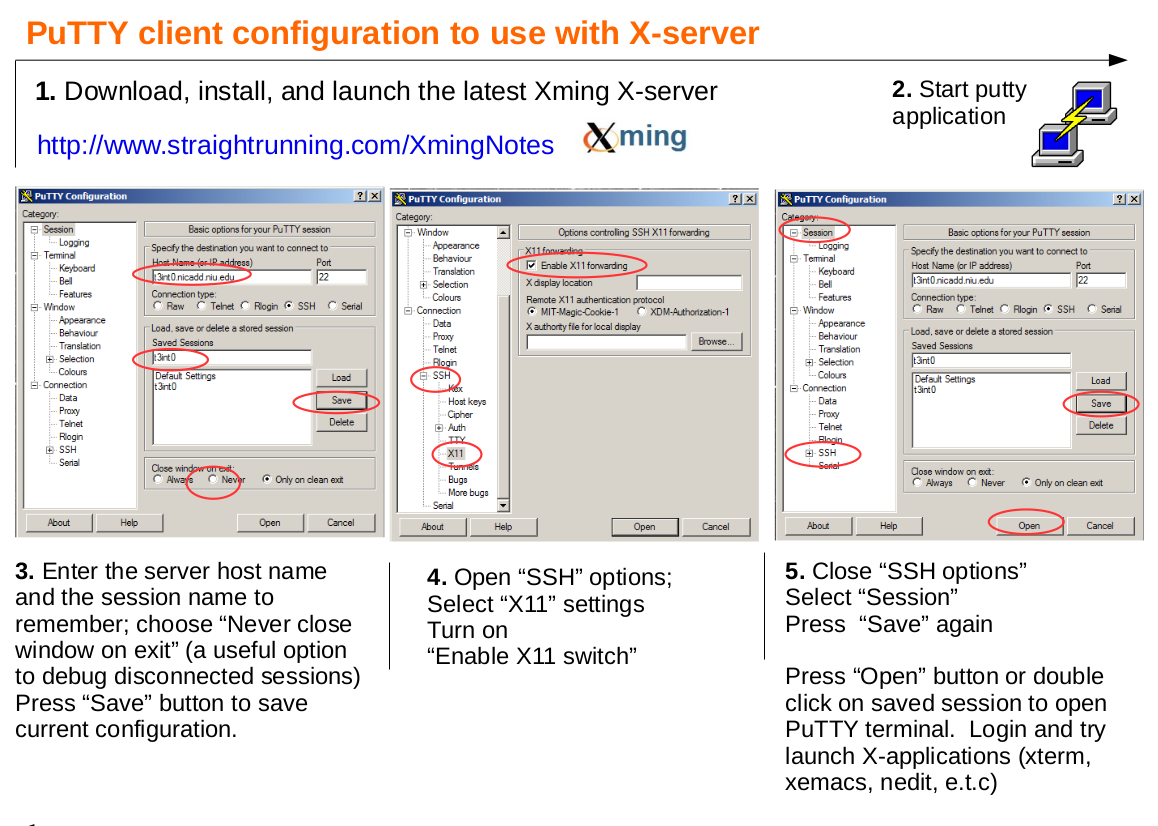
When done, open a PuTTY session and type "xterm &".
Transfer files to/from the cluster:
- Linux/MAC - scp, rsync (available in all distributions)
- Windows - free scp/clients (PuTTY, or WinSCP)
Outbound access to FNAL or CERN (default) nodes
- kinit -f remote_user_name@FNAL.GOV
- ssh remote_user_name@remote_node.fnal.gov
Data disks
The default quota for the user's home directory is 5 GB. This space should be used for configuration scripts and personal documents. All code development and data analysis work should be done on the cluster's data disks ( /xdata and/or /bdata).
Backup policy.
We only provide the previous day backup of /home area. We strongly encourage users to use the GIT system for any code development and do frequent backups of important data to remote locations.